
There’s no doubt that, one of the easiest ways to connect an external device to a Windows PC is via Bluetooth.
Today, there are a variety of devices that can be connected via Bluetooth to your computer, such as the mouse, keyboard, a speaker or something completely different. And best of all, this wireless network is becoming more efficient and faster.
However, not all Windows PCs come with Bluetooth from the factory, so we want to explain in detail how to activate Bluetooth in Windows.
It’s important to know that if you want to activate Bluetooth on your Windows computer you have to pay something for this network, because this service is not free, however, in this guide we explain a very economic option, easy to install and all the other details that you must take into account for your Bluetooth to work properly.
Ready to activate Bluetooth on your PC? Let’s get started.
Method 1: Windows Settings
Before you start using a Bluetooth device, it is important that you first set your items to the most advanced version. That’s why you should go to the Windows settings, then select Control Panel in Windows 7 and the Settings application in Windows 10.
WINDOWS 10
Step-1: In Windows 10, open Action Center and click the “All Settings” button. Then, go to Devices and click the Bluetooth button on the left side.
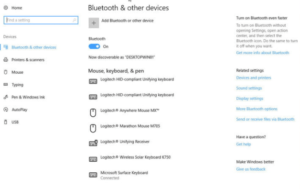
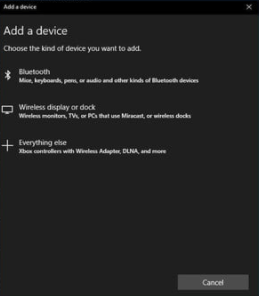
Step-2: In this step, you simply have to activate Bluetooth in the option that says “On”. Once you have activated Bluetooth, you can click on “Add Bluetooth or other devices”. Then click “Bluetooth” and Windows 10 will start searching for devices with the new network enabled.
Step-3: After you have started the process of syncing your Bluetooth device, within seconds you will see it appear in the list of available devices. Simply select it and then proceed according to the instructions that appear. Once you have connected the device, it will appear in the list of connected peripherals and that’s it!
You can now enjoy this external device on your PC.
WINDOWS 7
Usually, once you install and configure a Bluetooth adapter on a Windows 7 system, it automatically turns on and is ready to use. However, it is important to note that sometimes a laptop with built-in Bluetooth may have a keyboard shortcut that activates or deactivates Bluetooth, or even an icon that may be present in the system tray and will perform the same function. So be very careful if you mark it accidentally!
In addition, different PCs and Bluetooth adapters can come with the function to connect to a Bluetooth device. In that case, you can simply click the Start button and then right-click and select “Devices and Printers”. Then select “Add a device”, and click “Next”.
If this option doesn’t work for you, don’t worry, there is a solution for everything. Try opening the Control Panel and accessing “Hardware and Sound” and then “Devices and Printer” to get started. After this, just follow the instructions to pair up your device and you’re done.
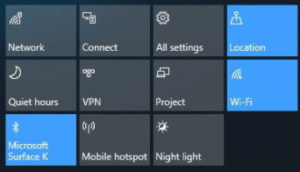
Method 2: Click the Bluetooth button in the Action Center
If you have a Windows 10 device, Bluetooth can be easily turned on and off by simply opening the Action Center and clicking Bluetooth. This button is the one with the Bluetooth icon, along with the “Not Connected” label, which will appear only if you are not using a Bluetooth device or an indication of a primary device that is connected and in use. It’s important to know that if the button is dimmed, then it means your Bluetooth is disabled. For e.g. in this image, the color is blue, which means, it is enabled.
 Once you’ve paired a Bluetooth device with your Windows PC, you should automatically connect it when they’re both on and within range.
As mentioned above, when you are not actively using Bluetooth, we recommend that you disable it to save battery power and eliminate the possible attack path of unwanted or infected documents.
From here, you will surely be able to enjoy your external devices in Windows via Bluetooth without any problem.