Text messaging, iMessage, SMS and MMS, are the most frequently performed tasks by people do on their smartphones, even more than making phone calls. For many, it’s the best way to keep in touch with friends and family. However, all these messages can easily be forgotten over time, or lost due to a simple error.
So how to save messages in iOS, so that you never miss those communications?
The easiest way to keep messages is to save them (obviously!), but doing this is not always as simple as it seems. You can’t save a text as easily as an image, but it’s certainly possible, and it will only take a few additional steps.
So here are the solutions to save text messages in iOS and Android
Saving text messages in iOS
Before you start saving your text messages, there’s something you need to install, just in case you haven’t already: iTunes. Some people have had some problems with Apple music and the iOS sync program, but for this, you need to be able to back up your iPhone or iPad to iTunes. You can create and save backups using iCloud, but it will be easier for you to access your texts (and other data) in the future using iTunes.
Step 1: Backup and save text using iTunes
When backing up iOS, you will save most of the data stored on your device, including iMessages, SMS, and MMS. If you haven’t already, get used to creating periodic backups. It’s for your own good.
Open iTunes. Then, connect your device to the computer.
In iTunes, select your iOS device by clicking the appropriate icon in the upper left corner of the window.
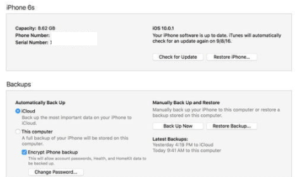
Go to the Summary tab: You should see a section called Backups on the right side. Under Manual Backup and Restore, choose Backup Now. Once the backup process is completed, the Latest Backups sections must be updated to show your most recent backup. Alternatively, you can go to Preferences> Devices (Mac) to confirm that the backup was successful.
Step 2: Accessing your messages using iExplorer
Your messages are now well saved, but that’s only the first part. The most important part is being able to access them on your computer whenever you want. You’ll need to use iExplorer, a premium program for MacOS, among other things, examine your backups and recover multiple messages. It costs $40 in its basic version, but you can also use the demo version.
Download iExplorer and follow the steps to install it. Mac users will need OS X 10.9 or higher, while Windows users need Windows 7 or higher. Then start iExplorer.
In iExplorer, find the Browse iTunes Backups tagged section in the left column, and choose the backup from which you want to extract messages. Within that backup, select Messages.
iExplorer will display your text messages, with a conversation list on the left. Choose a conversation to view your messages on the right, including pictures and attachments. You can also sort the list of conversations by name, date and number of messages.
![]() Once you have selected a conversation, you can export it as a PDF, TXT or CSV file. You can also choose to export only images or attachments.
Once you have selected a conversation, you can export it as a PDF, TXT or CSV file. You can also choose to export only images or attachments.
Using iExplorer
The above-mentioned iExplorer can extract text from an iTunes backup, but the program can also extract text directly from your iOS device. It’s perfect for those who want to avoid iTunes as much as possible.
Start by downloading and installing iExplorer. Then start the program. A general description will open on your device screen.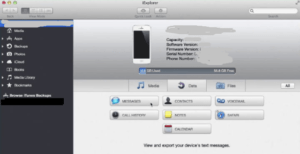
Then, connect your iPhone or iPad. In the left column, click on the name of your device. On the Device Overview screen on the right, click Data> Messages. Note that, if you’ve never backed up to your computer before, you’ll only see one option for Upload Backup Data. In other words, you will first need to back up within iExplorer before you can access your messages. So, click to start the process. Once this is done, continue with the next step.
iExplorer will load all messages to your iOS device. The left column will have a conversation list, and clicking on any of them will display the conversations in the right column. You can sort conversations by name, date or number of messages, as well as filter conversations to show only images, videos or attachments.
You can export entire conversations, including media and attachments, using the export options below the open conversation. They can be exported as a PDF, TXT or CSV file.
How to save text messages to Android
Using SMS Backup & Restore
Backing up your Android smartphone is not too complicated, although SMS Backup & Restore is a free application that does exactly what its name implies. You can back up your text messages and save them locally to your Android device, export them to a computer or upload them to an online storage service like Google Drive. It is made to meet the needs of those who want to store their messages in multiple locations and quickly. Your Android device will need to run Android 4.0.3 or higher.
Step 1: Start by downloading and installing the application on your Android device. When opened, the Main Menu will appear.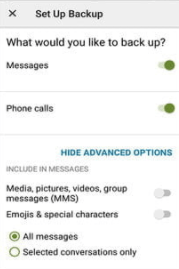
Step 2: Tap Configure a Backup to start creating a new backup. From here, you can choose what information you want to save, what text conversations and where these copies will be saved. There are currently options for saving your texts directly to your phone, Google Drive or Dropbox. You can also save the emojis attached to the text, as well as name the backup files so that they are easy to identify.
Step 3: If you don’t want to manually save your text messages, you can set a schedule designed to back up your information automatically at specific time intervals. You can do this in the application’s configuration, which can be accessed through the three horizontal lines (menu icon) in the upper left corner.
View, restore and move texts
Step 1: You can view your saved messages by going to the main menu and tapping View Backups, where you can access them in XML format. You can also change the local folder where they are stored in the application settings.
Step 2: If you are upgrading to a new smartphone, you can use SMS Backup & Restore to transfer your text messages between the two devices. There are ways to do this, including Restore and Transfer functions.